Ingredients
Tuna saku ready for slicing, totaling 3 lb
Sea salt
FOR SERVING:
Roll-Cut Daikon Tsuma
Shiso
Wasabi
Shoyu or Tosajoyu
Instructions
Place the tuna saku on a clean cutting board, and very lightly sprinkle the top, bottom, and sides with a small pinch of salt. Wrap tightly in a paper towel and then wrap tightly in plastic wrap and place in the coldest part of the refrigerator. The salt will draw out the excess water and blood. Check after an hour to see if the paper towel is saturated. If it is, rewrap the tuna with fresh paper towels and again with plastic. Let rest in the refrigerator for at least another 3 hours or overnight.
To slice the tuna: Place the saku on the cutting board with the most attractive side facing up. With a razor-sharp knife, start your cut at the base of the knife and draw your blade through the fish, cutting through the fish in a sing e stroke. Depending on the thickness of the saku, you can make your slices between ¼ to ½ inch / 6 to 12 mm thick; thinner for larger saku and thicker for the smaller ones. As you finish one slice, use the blade of your knife to push it on your cutting board a few inches to the right and continue with the next, stacking one next to the other. In this way your slices are arranged nicely and ready to be transferred to a chilled plate. Serve the tuna with the daikon tsuma, shiso, wasabi, and shoyu. Like beef, different parts of the loin will have different characteristics. I like to include three different cuts on each plate for a diversity of textures.

ROLL-CUT DAIKON TSUMA
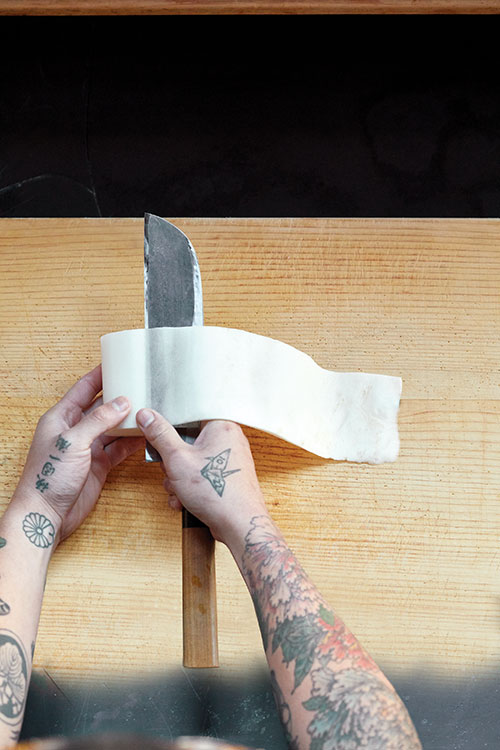
The most time-consuming of the sashimi garnishes is the daikon tsuma, a word that means “wife,” (a unsurprisingly sexist name, given Japan’s traditional gender roles), which describes the very finely sliced daikon that play a supporting role on the fin shed plate. When a cook expresses interest in training on the sashimi station, I’ll show them the basic daikon roll-cutting technique for making tsuma and will consider their request for training only after they present me with a perfectly cut bowl of tsuma. Although usually made with daikon, the same roll-cutting technique can be used with cucumbers, watermelon radishes, and carrots. I’ll often mix in a bit of this color to the daikon tsuma for visual interest. There is no substitute for practice when it comes to roll cutting. When I first started working in Japan, after a fourteen-hour shift, I would return to the drafty little house where I was staying and practice with a section of daikon before bedtime. That said, if you’d rather not invest in developing this skill, feel free to cut the daikon thinly with a mandoline and then slice it finely with a knife.
Choose a daikon that’s no more than 3 inches wide and cut it into 3-inch lengths. When you’re getting started, it’s easier to manage smaller pieces. As you gain experience, you can begin with thicker daikon and cut them into longer lengths. The knife that we use for roll cutting is called an usuba; its single beveled blade is straight and well suited for the job.
PREPARATION:
Trim the ends of the daikon so the piece sits perfectly flat when stood on its end.
Holding the daikon in your left hand, grasp it with your fingers wrapped around the back and your thumb facing you and rotate it onto your blade. Stack the sheets of daikon and cut very finely.
Continue rotating your daikon onto the blade, your two thumbs nearly touching and pulling the sheet of daikon over your blade. Keep the blade stationary, only moving it up and down in a small sawing motion. Remove the skin and round off the daikon to make a perfect cylinder.
Rinse the sliced daikon in a bowl of cold water. Store in water until you are ready to use them. They should keep in a tightly sealed container in the refrigerator for two days.
Notes

Excerpted with permission from Rintaro by Sylvan Mishima Brackett, Copyright © 2023. Photographs copyright © 2023 by Aya Brackett.
Published by Hardie Grant Publishing, October 2023.
- Prep Time: 1 hour
- Category: Sushi
- Cuisine: Japanese
Keywords: bluefin sashimi